How To Paint An Exterior Door
- Difficulty
- Easy
- Time
- 1 day (including dry time)
Does the outside of your home need a refresh? Brighten up your curb appeal with some new exterior door paint! This simple, DIY project can really transform the exterior of your home for a reasonable cost. Check out the below tips on painting your exterior door, straight from the experts at Norfolk Hardware & Home Center!
Before You Begin:
- Determine what kind of paint is currently on your door, if any. Exterior doors are painted with either water or oil-based paint. Doors with existing oil-based paint may require lower-grit sandpaper than water-based paint. Check out Benjamin Moore’s video above for tips on how to determine what type of paint is on your exterior door!
- (Optional) Remove the door from its hinges. Place on a sawhorse or other flat surface
- Tape off all door hardware with painter’s tape or remove it with a screwdriver. Removing the hardware allows for a more even surface to paint and requires less maneuvering.
Materials
- Benjamin Moore Aura Grand Entrance, or other exterior paint
- Light or medium-grit sandpaper
- Painter's tape
- Tack cloth
Tools
- Screwdriver
- Angled paintbrush
- 4" roller brush
- Roller tray
Step 1: Prepare Exterior Door Surface
Clean your door surface. If any problem areas exist, like nicks or splinters, scrape them away. Then, sand and scuff the door surface to remove any glossy finish and help surface adhesion. Wipe the door clean of any remaining dirt or dust using a tack cloth.
Step 2: Prime Door
Primer helps hide the old paint finish while providing a better surface for new exterior paint to adhere. Apply one coat of primer to your door and allow to dry.
Pro Tip: Make sure to use an angled brush to get all the nooks and crannies!
Step 3: Paint Door Edges
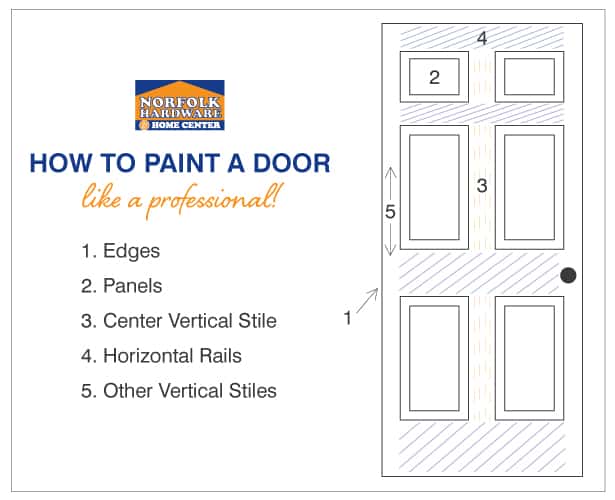
Starting with the edge closest to the hinges, paint the exterior door edges. This allows more time for the edges to dry and prevents sticking, which is especially important if you have elected to leave your exterior door in place. Start from the top of the door and work your way down.
Step 4: Paint Inside Panels (if applicable)
If you have a panel door, use an angled paint brush to paint each panel. Paint the inside of the panel first, then move to the edges, starting from the top down. Pay attention to the lower corners where paint tends to build up. If you see any paint pooling, be sure to brush it out while the paint is still wet.
Step 5: Paint Stiles & Rails
After all the panels have been painted, use your 4” roller brush to paint the center stile, followed by the 3 horizontal rails, and finish with the outermost vertical stiles.
Pro Tip: We recommend using a paintbrush to go over the surface afterwards, a technique called “back-brushing”. This will help you achieve a smoother surface and make sure everything dries evenly.

Step 6: Apply Second Coat
Allow the exterior paint to dry and lightly sand the door. This will give you an ultra-smooth finish. Wipe the surface clean and apply a second coat of paint following the order specified above. Allow the whole exterior door to dry fully, about 24 hours from your final coat.
Step 7: Reattach Exterior Door & Hardware
If you removed the door from its hinges, reattach the door and all hardware. Remove any painter’s tape. Enjoy your beautifully refreshed front door!


